 Waypoint screen
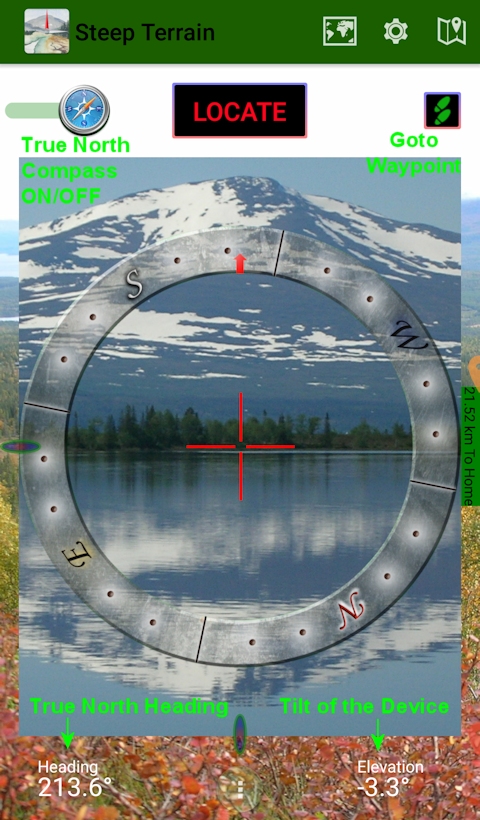
Aim the red crosshairs towards a target in the terrain and tap the LOCATE button.
After a 2.5 second countdown, the app will calculate the distance to the target at the crosshairs.
Enter the Chart screen to fine tune the
Horizontal and Vertical Distance values.
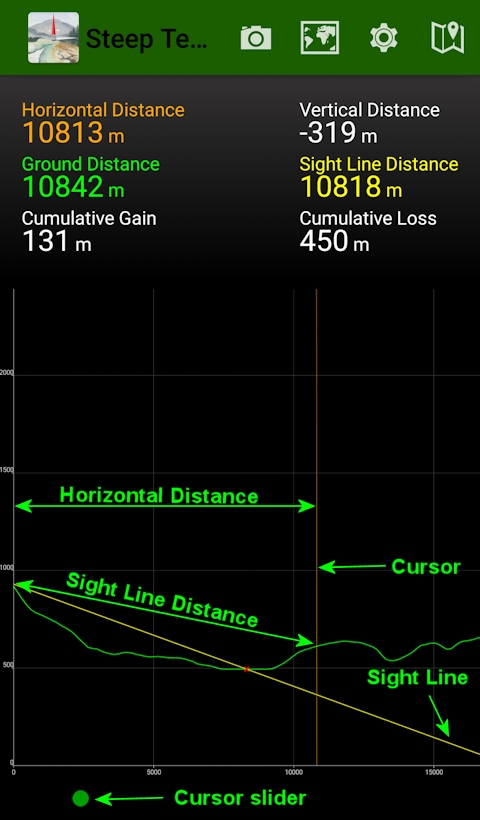
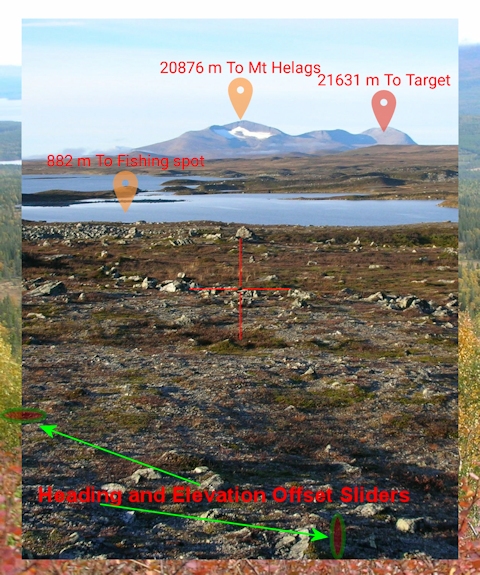
The Chart screen shows the Sight line and Altitude profile
(height
from sea level) up to 80km from the device camera. Any unintended errors in the
target location due to errors in the device tilt angle during the measurement
can be adjusted by dragging the green
Cursor
slider at the
bottom of the screen. Cursor movement
will also update the red Target marker on the Map and Camera screen.
Tips: When trying to locate a mountain summit at the horizon aim the crosshairs over the summit. The distance meter always stops at the horizon (the summit) and no cursor compensation is needed.
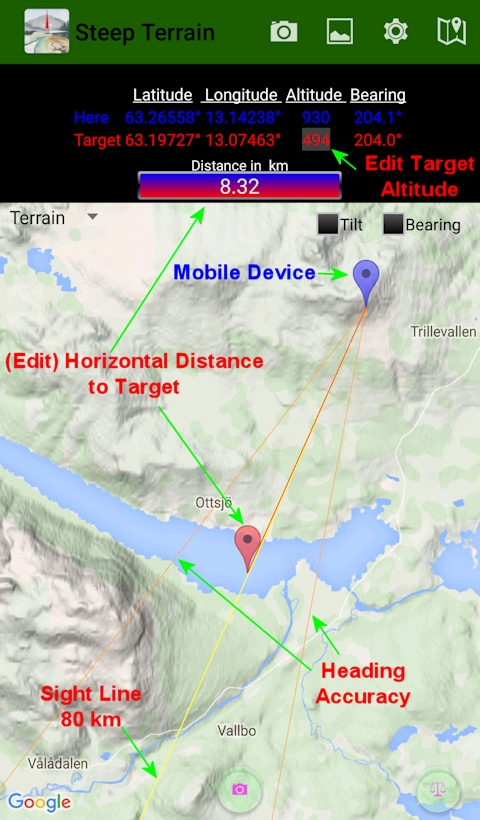
The Map screen has two draggable markers, the blue for the location of the mobile device and the red for the target location. The red Target marker can also
be moved by entering a new value in the Horizontal Distance text box. No recalculation of altitude data is done when a marker is moved by the user.
Tap the Edit Target Altitude box to change the altitude of the Target marker. If the altitude value is unset (0), the user can select
to automatically download the altitude value of the Target marker. If the Target marker is located on the ocean, a negative value is downloaded.
This value is the depth of the sea at the location of the Target marker.
Tap the Bearing and Tilt checkbox to rotate the map according to the device compass heading and elevation (tilt).
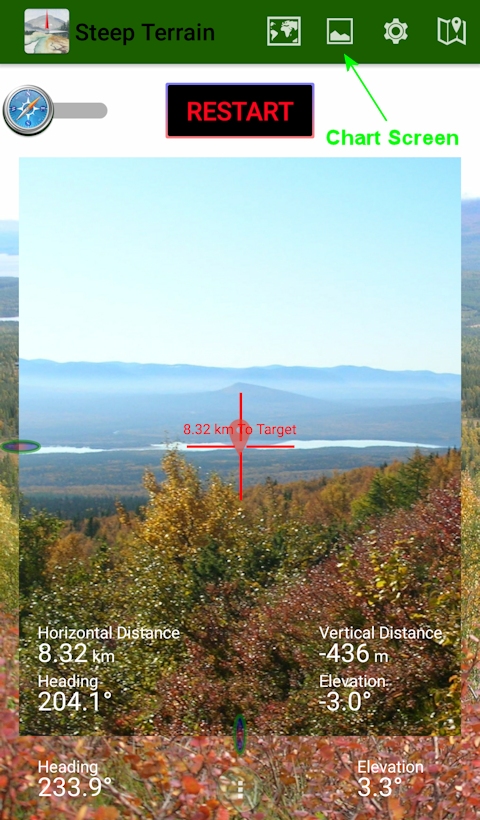
Tap the Camera button at the bottom of the map to add a camera view as a semi-transparent layer above the map.

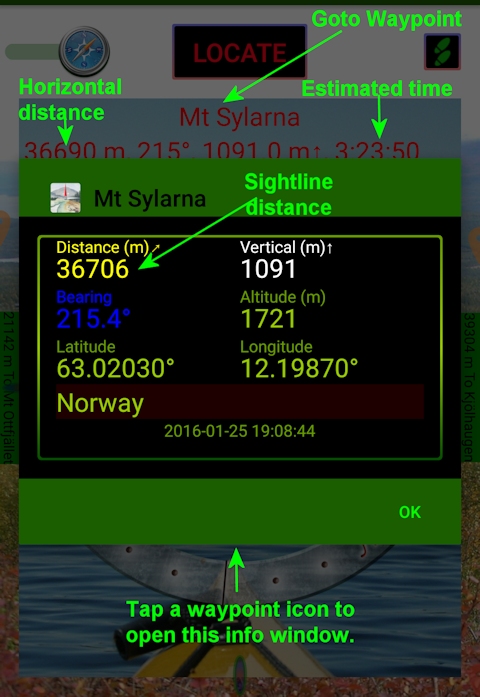
The Camera view can show up to up to 14 (10 inside and 4 outside) of the nearest waypoints with a name and horizontal distance label. Tap a waypoint icon to show extended info. Remember that if the Target market is dragged by the user in the Map screen, the altitude value is set to 0 and the vertical position of the Target marker is set from this 0 value in the Camera view. Tap the Goto Waypoint button to select a waypoint to navigate to.
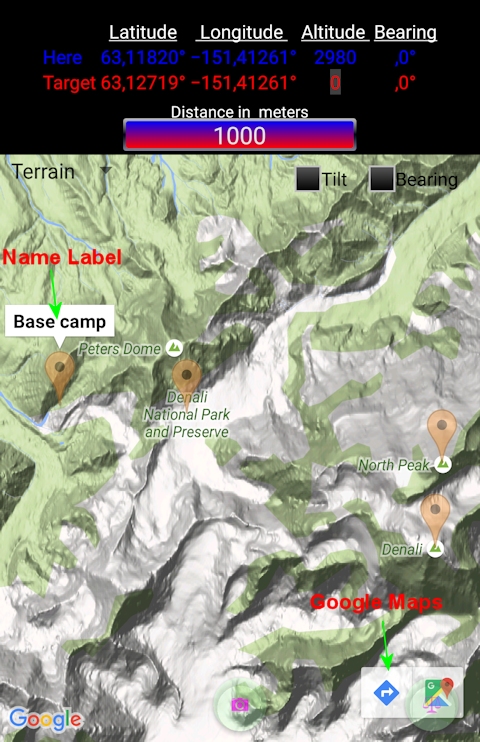
Tap a marker, and a Name Label pops up. This tap also displays a Google Maps icon which open up a navigation view with extended waypoint navigation features.
Waypoint screen
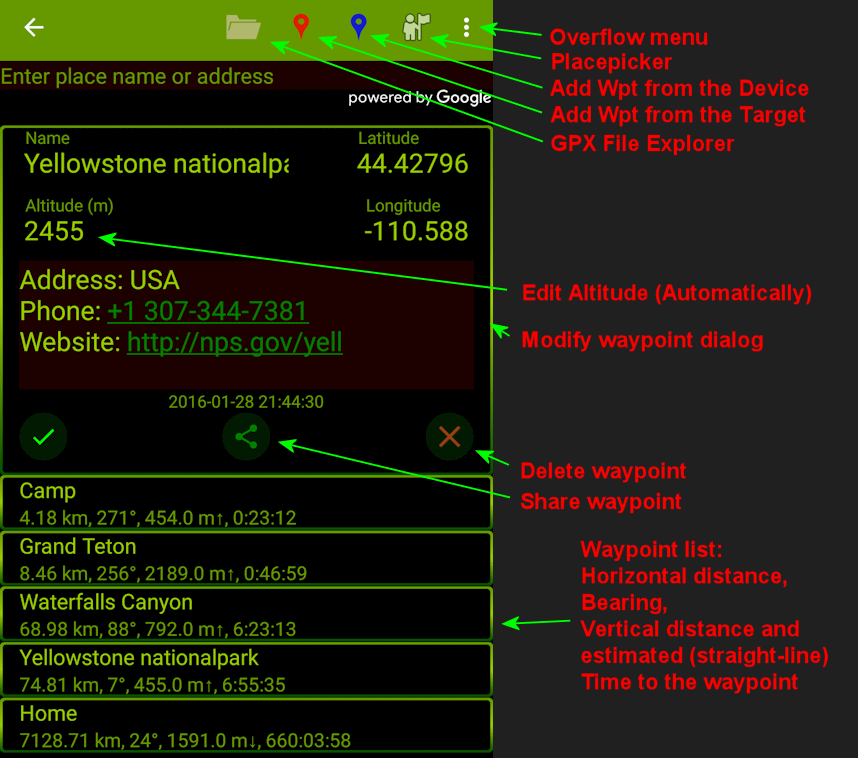
Search for new waypoints to add, in the Placepicker or add them from one of the Target/Device markers. Tap a waypoint in the waypoint list to modify a waypoint.
Tap the Edit Altitude box to modify the altitude value of a waypoint. If this value is 0, the user get one chance to automatically download and set the altitude value. If the waypoint is located on the ocean, a negative value is downloaded. This value is the depth of the sea at the waypoint location. When a waypoint is added from the Target marker and some of the location values are changed, the location of the Target marker is also changed in the Camera view and on the Map.
First time users is recommended to create a waypoint directory in Google Drive from a PC. Select Append waypoints in the GPX File Explorer to load a waypoints file into the app. Note: When saving modified waypoints into an existing .gpx file, no automatic removal of the previous version is done.
The waypoints are persistent and return each time the app is started.
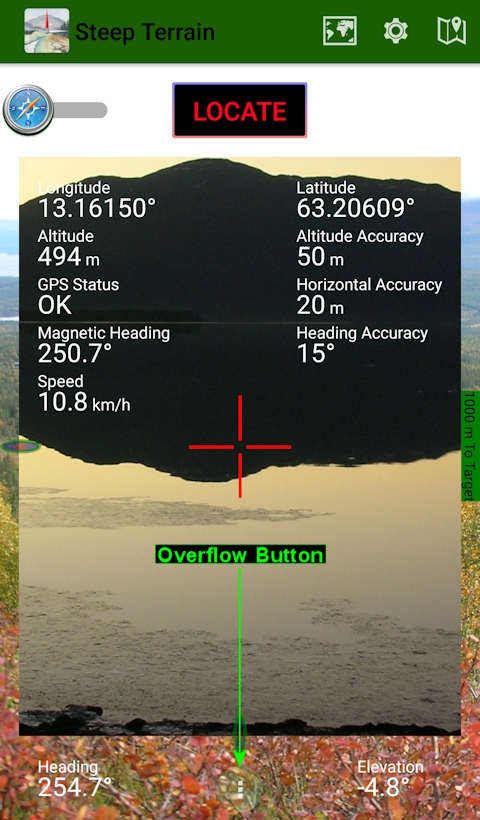
Tap the Overflow button to make sure the device has an accurate Altitude value before the LOCATE button is tapped.
After the LOCATE button is tapped the Overflow button can be used to set a black background in contrast to the white text in the view.
The best value of the Heading Accuracy is ±15 degrees. This is a rough value; the reading can be off by as much as 30 degrees if metals or electromagnetics
interfere the compass sensor. If the mobile device is in a magnetic case, remove it.
To calibrate the compass sensor for an accuracy within 10-15 degrees:
Move the device around in a figure eight pattern, after this, slowly rotate the device 360° 1-2 times around each of its three axes, as shown in this YouTube video.
The Heading and Elevation values are only as good as your hardware. To improve the accuracy of the sensors the app can add Offset values to the Heading and Elevation values.
The Heading and Elevation Offset sliders offers a quick way to compensate for heading and elevation errors. Drag the sliders until some waypoint with known location is on the right place in the Camera view. This also works well when the LOCATE button is tapped and a still image is shown.
Note: The Offset values become more inaccurate the more the camera crosshairs are rotated away from the location of the calibration.
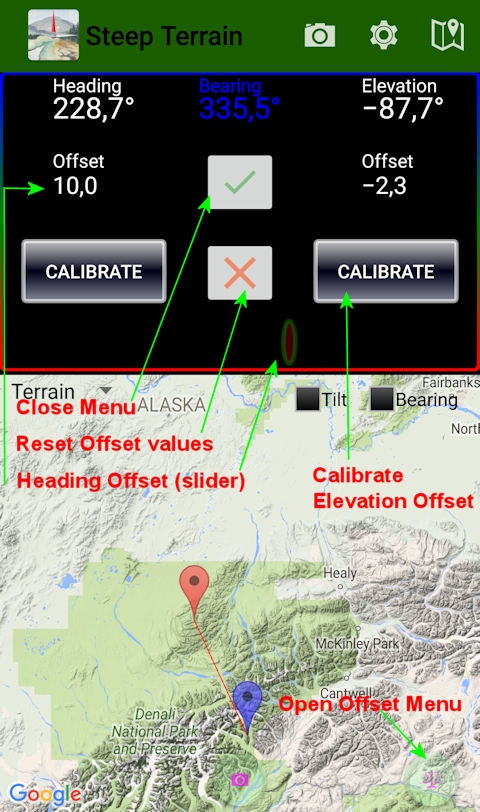
The second
way to calibrate the Offset values is
by tapping the Scale button in the
right bottom of the Map screen to
open the Offset menu.
Calibration of Elevation offset:
❄ Lay down the device on a flat surface or maybe better place it against a vertical surface.
❄ Tap the right Calibrate button.
Another way is to manually modify the Elevation Offset value with input from the following formulas:
- 90 - Elevation value = Elevation Offset, if the device is horizontal.
- Elevation value = Elevation Offset, if the device is vertical.
Calibration of Heading offset:
❄ Place the Target marker in a known visible location, roughly in the same direction as the intended target. (A nearby location is easy to find on a detailed satellite map.)
❄ Make sure the camera is running in the Camera view.
❄ Tap and hold the left Calibrate button.
❄ Aim the camera crosshairs in the direction of the location of the Target marker.
❄ Release the Calibrate button and the app will automatically calculate the Heading Offset from the formula:
Bearing value – Heading value = Heading Offset
It’s important that the Heading Offset calibration is done roughly in the same direction as the intended target location. A heading value in the opposite direction may need another Heading Offset.
Two more ways to compensate for heading interference:
|
(I) |
Point a real magnetic compass towards the intended target. Tap the Overflow button below the Camera view and check the Magnetic Heading value (with Heading Offset set to zero) when the device is heading towards the intended target. Calculate the Heading Offset from the formula: Real compass heading – Magnetic heading value of the device = Heading Offset
|
|
(II) |
Check the Bearing checkbox and use the Heading Offset slider to match the rotated map with the Camera view.
|
 Setting Menu
❄ Imperial or metric units can be selected.
❄ Locate Credits counter:
Every time the LOCATE button is tapped and a new altitude profile is downloaded the Locate Credits value decreases. The five first Locate Credits are free. After that, you receive one free camera locate per 24 hours. 100 extra Locate Credits can be purchased in the app.
If you need further assistance or want to
send your suggestions, please feel free to e-mail me: john@bergstedts.nu
Thanks!
John Bergstedt
Högvallen 406
83010 Undersåker
Sweden
+46 (0)705602582